8.27.2013

Target Tuesdays: 3.1 Phillip Lim for Target [Part 1]


Philip Lim for Target Part 1For months (and I mean MONTHS), the blogs, twitter feeds, and websites have been tuning into one of the greatest collaborations in retail history (yes it's that serious). Methodically launching after Mercedes-Benz fashion week so we're not all left depressed after fashion week is over, yayyy something to look forward to! Target and darling designer Philip Lim will be releasing the exclusively limited 3.1 Philip Lim for Target on September 15th!! If this is news to you, you poor, poor thing, where have you been?!

The coveted collection of apparel and accessories will debut both a women and men line with more than 100 items, ranging in price from $19.99-$299.99 including an assortment of bags, shoes and traveling items for jet-setters on the go (totally in line and convenient for those last minute vacations that I seem to be going on more frequently this year). 
I've always admired how Lim incorporates well-taylored looks for the dressy meets casual look with oversize prints and a prepster-school girl flair. He definitely nails his signature look with his new collaborative project with Target (score!). I mean really, seeing his stuff on the runway made his coveted pieces seem unreachable! This fall, you won't be getting any whip lashes when glancing at the price and we, my wallet and I couldn't be happier {^_^}

I'm sure that Lim and his team have spent tireless hours putting together the look book but for the next three Target Tuesdays, I'll be styling my favorite pieces based on my own personal tastes and influences as if I was given free reign to raid the entire line! (insert Pinky & the Brain laugh here..muhahahaha). Ok, but getting back to the above look, I love how the mini gold purse compliments the robbia blue trousers with the oversize printed charmeuse. Darn you Lim, Love! Love! Love!

See below the look book version below:

side by side of 3.1 Philip Lim for Target

Follow Your Favorites

8.01.2013

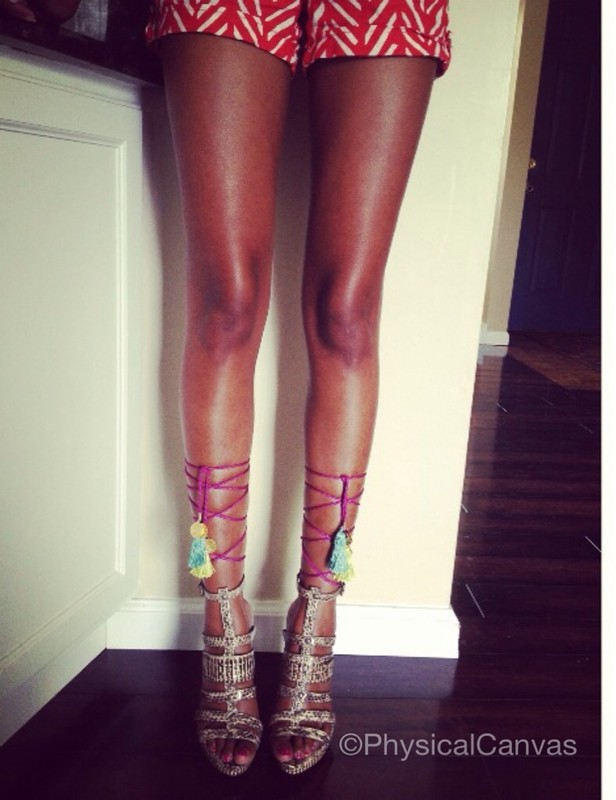
DIY: Jimmy Choo "Dream Tassel" Sandal

DIY Jimmy Choo
So before you go all goo-goo-gaa-gaa on me after reading today's title, let me tell you how I was inspired to do this DIY.

Ok, so a few weeks ago, (4 weeks to be exact) I was flipping through my Instagram feed and a picture from the ever so lovely Aimee Song {from Song of Style} stopped my little finger from swiping right in my tracks. The picture posted was of her new Jimmy Choo shoes with the caption "These tassels are going to end up on the floor." 

REWIND.....

Never mind the fact that the metallic striped carpet perfectly played off of the snake skin Jimmy Choo babies that she seemed to adore. I.was.in.love.at.first.sight. As I kept reading the comments of those who shared a similar obsession {and differing dislike} one thing kept popping up in my head.

I can make those.... And so I did.

Originally $1,495 {yes, the comma is in the correct place, thank you} the Jimmy Choo 'Dream Tassel Sandal" is a part of the 2013 Spring Collection adorned with beautifully coloured tassels, ankle tie and a 4.7 inch heel. But with a little imagination and a shoe string budget, I was able to duplicate a similar pair for less than $11. Here's how. 

What you will need:
  • a pair of open toed sandals that are a snaked skin print {open toed if possible}
  • 4 different coloured tassels
  • 8 gold coins
  • 4 gold end crimps
  • 4, gold 7mm rings
  • 2 yards of lavendar cord for the ankle 
  • pilers
Step 1:
Purchase your tools
DIY Jimmy Choo

Step 2:
Prep your first tassel by opening the ring and looping it right into the top of the opened crimp. Don't close the ring yet....
DIY Jimmy Choo

Step 3
Now add to the ring two gold coins, separating the pair with a small bead {read below as to why this is important}. Now close the gold ring with pliers.
DIY Jimmy Choo

Step 4
Grab your cord, and cut the 2 yards of cord in half so that there is 1 yard of cord for each leg. Take the first cord and insert one end into the crimp {as shown below}. The tape is from the store, but feel free to dab a little hot glue on the end of the cord to prevent fraying while you're working with it.

DIY Jimmy Choo

Step 5
Add both the teal and the lavendar cord into the crimp and cut the other teal tassel. Then pinch the crimp tightly shut {the tassel originally comes on a loop, so I clipped it at the top so that only one side would go into the crimp}.

DIY Jimmy Choo

Step 6
Repeat steps 1-5 to secure the remaining tassel to the other end of the cord.

Repeat steps 1-5 to secure the other two tassels on the ends of the second lavender cord.

DIY Jimmy Choo
Note: it's important to have two coins side by side, separated with a bead to get the jingle sound as you walk. So don't skimp on the coins!

Step 7
Wrap the lavender cords starting at the base of your ankle.


VOILA, FINISHED!
DIY Jimmy Choo
    How did yours come out? 
    I wanna know!

    Follow Your Favorites

    Related Posts Plugin for WordPress, Blogger...