Showing posts with label DIY. Show all posts

8.01.2013

DIY: Jimmy Choo "Dream Tassel" Sandal

DIY Jimmy Choo
So before you go all goo-goo-gaa-gaa on me after reading today's title, let me tell you how I was inspired to do this DIY.

Ok, so a few weeks ago, (4 weeks to be exact) I was flipping through my Instagram feed and a picture from the ever so lovely Aimee Song {from Song of Style} stopped my little finger from swiping right in my tracks. The picture posted was of her new Jimmy Choo shoes with the caption "These tassels are going to end up on the floor." 

REWIND.....

Never mind the fact that the metallic striped carpet perfectly played off of the snake skin Jimmy Choo babies that she seemed to adore. I.was.in.love.at.first.sight. As I kept reading the comments of those who shared a similar obsession {and differing dislike} one thing kept popping up in my head.

I can make those.... And so I did.

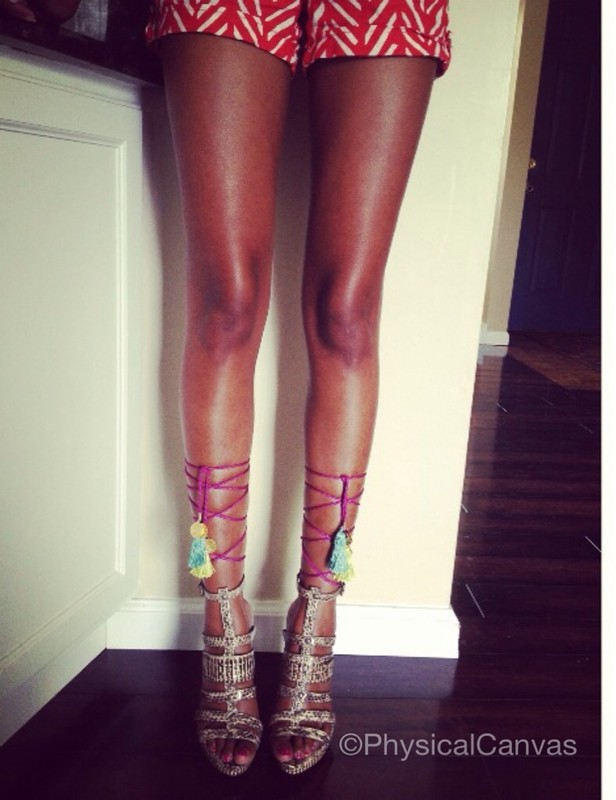
Originally $1,495 {yes, the comma is in the correct place, thank you} the Jimmy Choo 'Dream Tassel Sandal" is a part of the 2013 Spring Collection adorned with beautifully coloured tassels, ankle tie and a 4.7 inch heel. But with a little imagination and a shoe string budget, I was able to duplicate a similar pair for less than $11. Here's how. 

What you will need:
  • a pair of open toed sandals that are a snaked skin print {open toed if possible}
  • 4 different coloured tassels
  • 8 gold coins
  • 4 gold end crimps
  • 4, gold 7mm rings
  • 2 yards of lavendar cord for the ankle 
  • pilers
Step 1:
Purchase your tools
DIY Jimmy Choo

Step 2:
Prep your first tassel by opening the ring and looping it right into the top of the opened crimp. Don't close the ring yet....
DIY Jimmy Choo

Step 3
Now add to the ring two gold coins, separating the pair with a small bead {read below as to why this is important}. Now close the gold ring with pliers.
DIY Jimmy Choo

Step 4
Grab your cord, and cut the 2 yards of cord in half so that there is 1 yard of cord for each leg. Take the first cord and insert one end into the crimp {as shown below}. The tape is from the store, but feel free to dab a little hot glue on the end of the cord to prevent fraying while you're working with it.

DIY Jimmy Choo

Step 5
Add both the teal and the lavendar cord into the crimp and cut the other teal tassel. Then pinch the crimp tightly shut {the tassel originally comes on a loop, so I clipped it at the top so that only one side would go into the crimp}.

DIY Jimmy Choo

Step 6
Repeat steps 1-5 to secure the remaining tassel to the other end of the cord.

Repeat steps 1-5 to secure the other two tassels on the ends of the second lavender cord.

DIY Jimmy Choo
Note: it's important to have two coins side by side, separated with a bead to get the jingle sound as you walk. So don't skimp on the coins!

Step 7
Wrap the lavender cords starting at the base of your ankle.


VOILA, FINISHED!
DIY Jimmy Choo
    How did yours come out? 
    I wanna know!

    Follow Your Favorites

    3.24.2011

    DIY Bandage Skirt


    I never thought of doing DIYs until people started asking me to and I am not sure as to why I haven't pursued the idea sooner. Many of the items in my closet are designed and sewed by myself since I can never find what I'm looking for in the store that is the correct fit, shape, or colour. And if I do find it, it's highly over priced...the story of my life! So here goes...thanks Necca from Chictopia for requesting this DIY! (this may look like a lot but read through it first and then proceed)

    The great thing about the bandage skirt, introduced and made popular by Herve Ledger, is that it sucks everything in leaving you with a nice form fitting skirt or dress. The material is cut into strips and sewn in layers to give the illusion of a flattened stomach and slimmer hips. (usually people with curvier figures wear them to accent their figure like Beyonce for example).

    So because of this I started off by laying my four neon pieces of fabric in strips side by side (I'm missing one colour because I used it all-these are the scraps that I have left over). I knew that I didn't need a lot of fabric so for each colour I only purchased a 1/4 of a yard (you can use more at your discretion). There aren't very many fabric stores with higher end fabric like the NYC stores in the garment district that I frequented for cool finds. So the closest thing that I could find were bathing suit/costume material which came in many neon colors and stretch for added elasticity.

    I doubled the fabric (so that the skirt would have some weight and thickness so my panty line wouldn't show *that's key*) and cut  4 strips (one of each colour) into 4.5inch pieces. I then sewed around the perimeter of each strip and left a little opening to flip the strip inside out. (Remember you're just sewing the strips in a rectangle but the stitching is exposed. Leave an opening so that you can turn it inside out for a smooth finish. Hand stitch the small opening closed).


    Then I took all four strips and sewed them together "back to back" with a small seam. This makes the skirt look like individual strips made to create one finished piece. Remember the above picture is scrap so its a bit too short to wrap around my body. Use as much fabric as you need and cut whatever access you don't need.

    This is what I mean by "back to back" small seam (or just pinch the fabric). My bobbin kept messing up so the stitches look sloppy on the inside but clean on the right side. Bathing suit material is extremely slippery so don't get discouraged if it runs away from you on the machine.

     Now you have all four strips (or however many you choose) sewn together into this long piece of fabric. The next step would be to actually make the shape of the skirt that fits you. You can take a favourite skirt that you like and use it as a pattern or do what I did...wrap it around your waist and pin it to yourself. The reason being is that since the fabric is stretchy its difficult to see how tight it really needs to be in order to create the smooth finish.


    The skirt will dramatically shrink-my skirt ended up measuring 12 inches across at the waist and 14 inches across at the bottom. (that's measuring from tip to tip not the circumference-so it would be a 24 inch waist, but it stretches beyond that). I based the measurements on what felt comfortable enough to get over my hips but tight enough to lay smoothly on my figure. Now I know it looks funny because the seam is at the side (usually the left side would mimic the right) but I did that intentionally because once I turned it inside out I moved the seam to the center back to avoid seams down the side of my thighs....

     Tip: Make sure to line your strips up with the center back or else the colours will be off kilter. It looks crooked here because of how I cut it out, but once on its completely straight.

    TADA!

    A bandage skirt similar to the picture in the Cayman Islands on my blog.

    Thanks!

    Follow Your Favorites

    3.17.2011

    DIY:Make Your Own High-Waist Harem Pant

    I wanted to feature a DIY post for the high waist harem pants that I made in this picture of me in the Cayman Islands but I forgot that I even took pics of the creation process. I've had a few people compliment me on them and to tell you the truth I'm actually not sure if you can find them in the stores hey maybe you can, round of applause to you but why not just make it in the colour you want? I'll try to make this as quick and painless and possible! 
    Follow along....


    Normally, I would use a pant pattern to sew this but that would require me to cut out each leg and then sew it together up the crotch (sorry that's just what it is) but I was really pressed for time since my flight left in a few hours. I also somehow decided to dye my hair right before I got on the plane...can someone give me the queen of procrastination award already? So I laid a pair of pants that I liked onto the fabric. This may not have been the best pair of pants to use, but I knew the look and shape that I wanted-a jersey fitted pant that draped away from my thighs with a closer fit towards the ankle.
    ~cut, cut away!~


    I admit this looks pretty rough since I was rushing, but once the edges are sewn the steams rounds out. I also may have trimmed the corners for a smoother look as well after I took the photo.


     The last step was to create the extra material to create the waist band. I knew I wanted it a little bit above my belly button, so I cut a piece of fabric 8 inches wide and 32 inches long (I'm a size 2). I always give myself a little wiggle room for mess ups but keep in mind that you want to make it snug on your waist so its not droopy. Then attach the waistband to the top of the pant with pins and try it on. Sometimes this isn't the best idea because I scrape my skin every time. Here's a tip: Make sure to sew the waist band all the way around the top of your pants and have the two ends of the waist band meet in the back of your pants. Center the seam to your tail bone so your pants don't look crooked from behind.

    Tada! 
    High-waist Harem Pants

    Click HERE for the original post 
    "Journey to the Caribbean"

    Follow Your Favorites

    10.29.2010

    Her Name Is Lola

    I've always loved the LOLA perfume bottle by Marc Jacobs and I got an idea....


    For Halloween, I’m going as the Marc Jacobs LOLA perfume bottle!


    Ok, maybe I exaggerated a little about ‘going’ anywhere as if I’ll be out on October 31st at a party collecting goodies from strangers who don’t use hand sanitizer because the truth is I actually don’t remember the last time I participated in Halloween. I remember being sent to the cafeteria in elementary school along with my friend Fatimah and her brother while the Halloween costume parade began on the floor above us. Come to think of it, it felt like a cruel joke to have a party that you couldn’t go to as a kid. Listening to kids shovel mouthfuls of smarties, blow pops, and sweet tarts while picking out the less desirable candy corns and black licorice out of goodie bags like seeds in a watermelon was torture. The smell of processed sugar was definitely in the air and curled into our nostrils while the three of us just sat there...in an empty cafeteria...built for a capacity of 300 people, all because we didn’t celebrate Halloween due to her Muslim beliefs and my Christian upbringing. In hindsight, there should have been four of us, but my little sister joined the festivities to grab her fair share of cavities candy. In later years my mom caved in, to spare us from being ostracized at school and made me a red Mrs. Clause costume, trimmed in fur (for some reason my sister was a witch every year). To this day I haven’t the slightest clue as to why I was a holiday figure on Halloween….


    As you can see I’m ‘going’ as the 1.7oz since I don’t have the hips or the booty to be the 3.4oz. The truth is I made this outfit for fun. 


    I am absolutely infatuated with the design of the bottle and I needed an excuse to make it. Have fun and be safe this weekend!

    Follow Your Favorites

    Related Posts Plugin for WordPress, Blogger...